AI-Assisted Editing
The AI text tab lets you build and change a scenario by describing what should happen in plain language. The text is processed by AI, which generates the matching actions in the Scenario Description area.
Nothing is applied behind your back: generated changes arrive in a preview that you either accept or discard, and the resulting actions stay visible in the Commands tree like any hand-built ones.
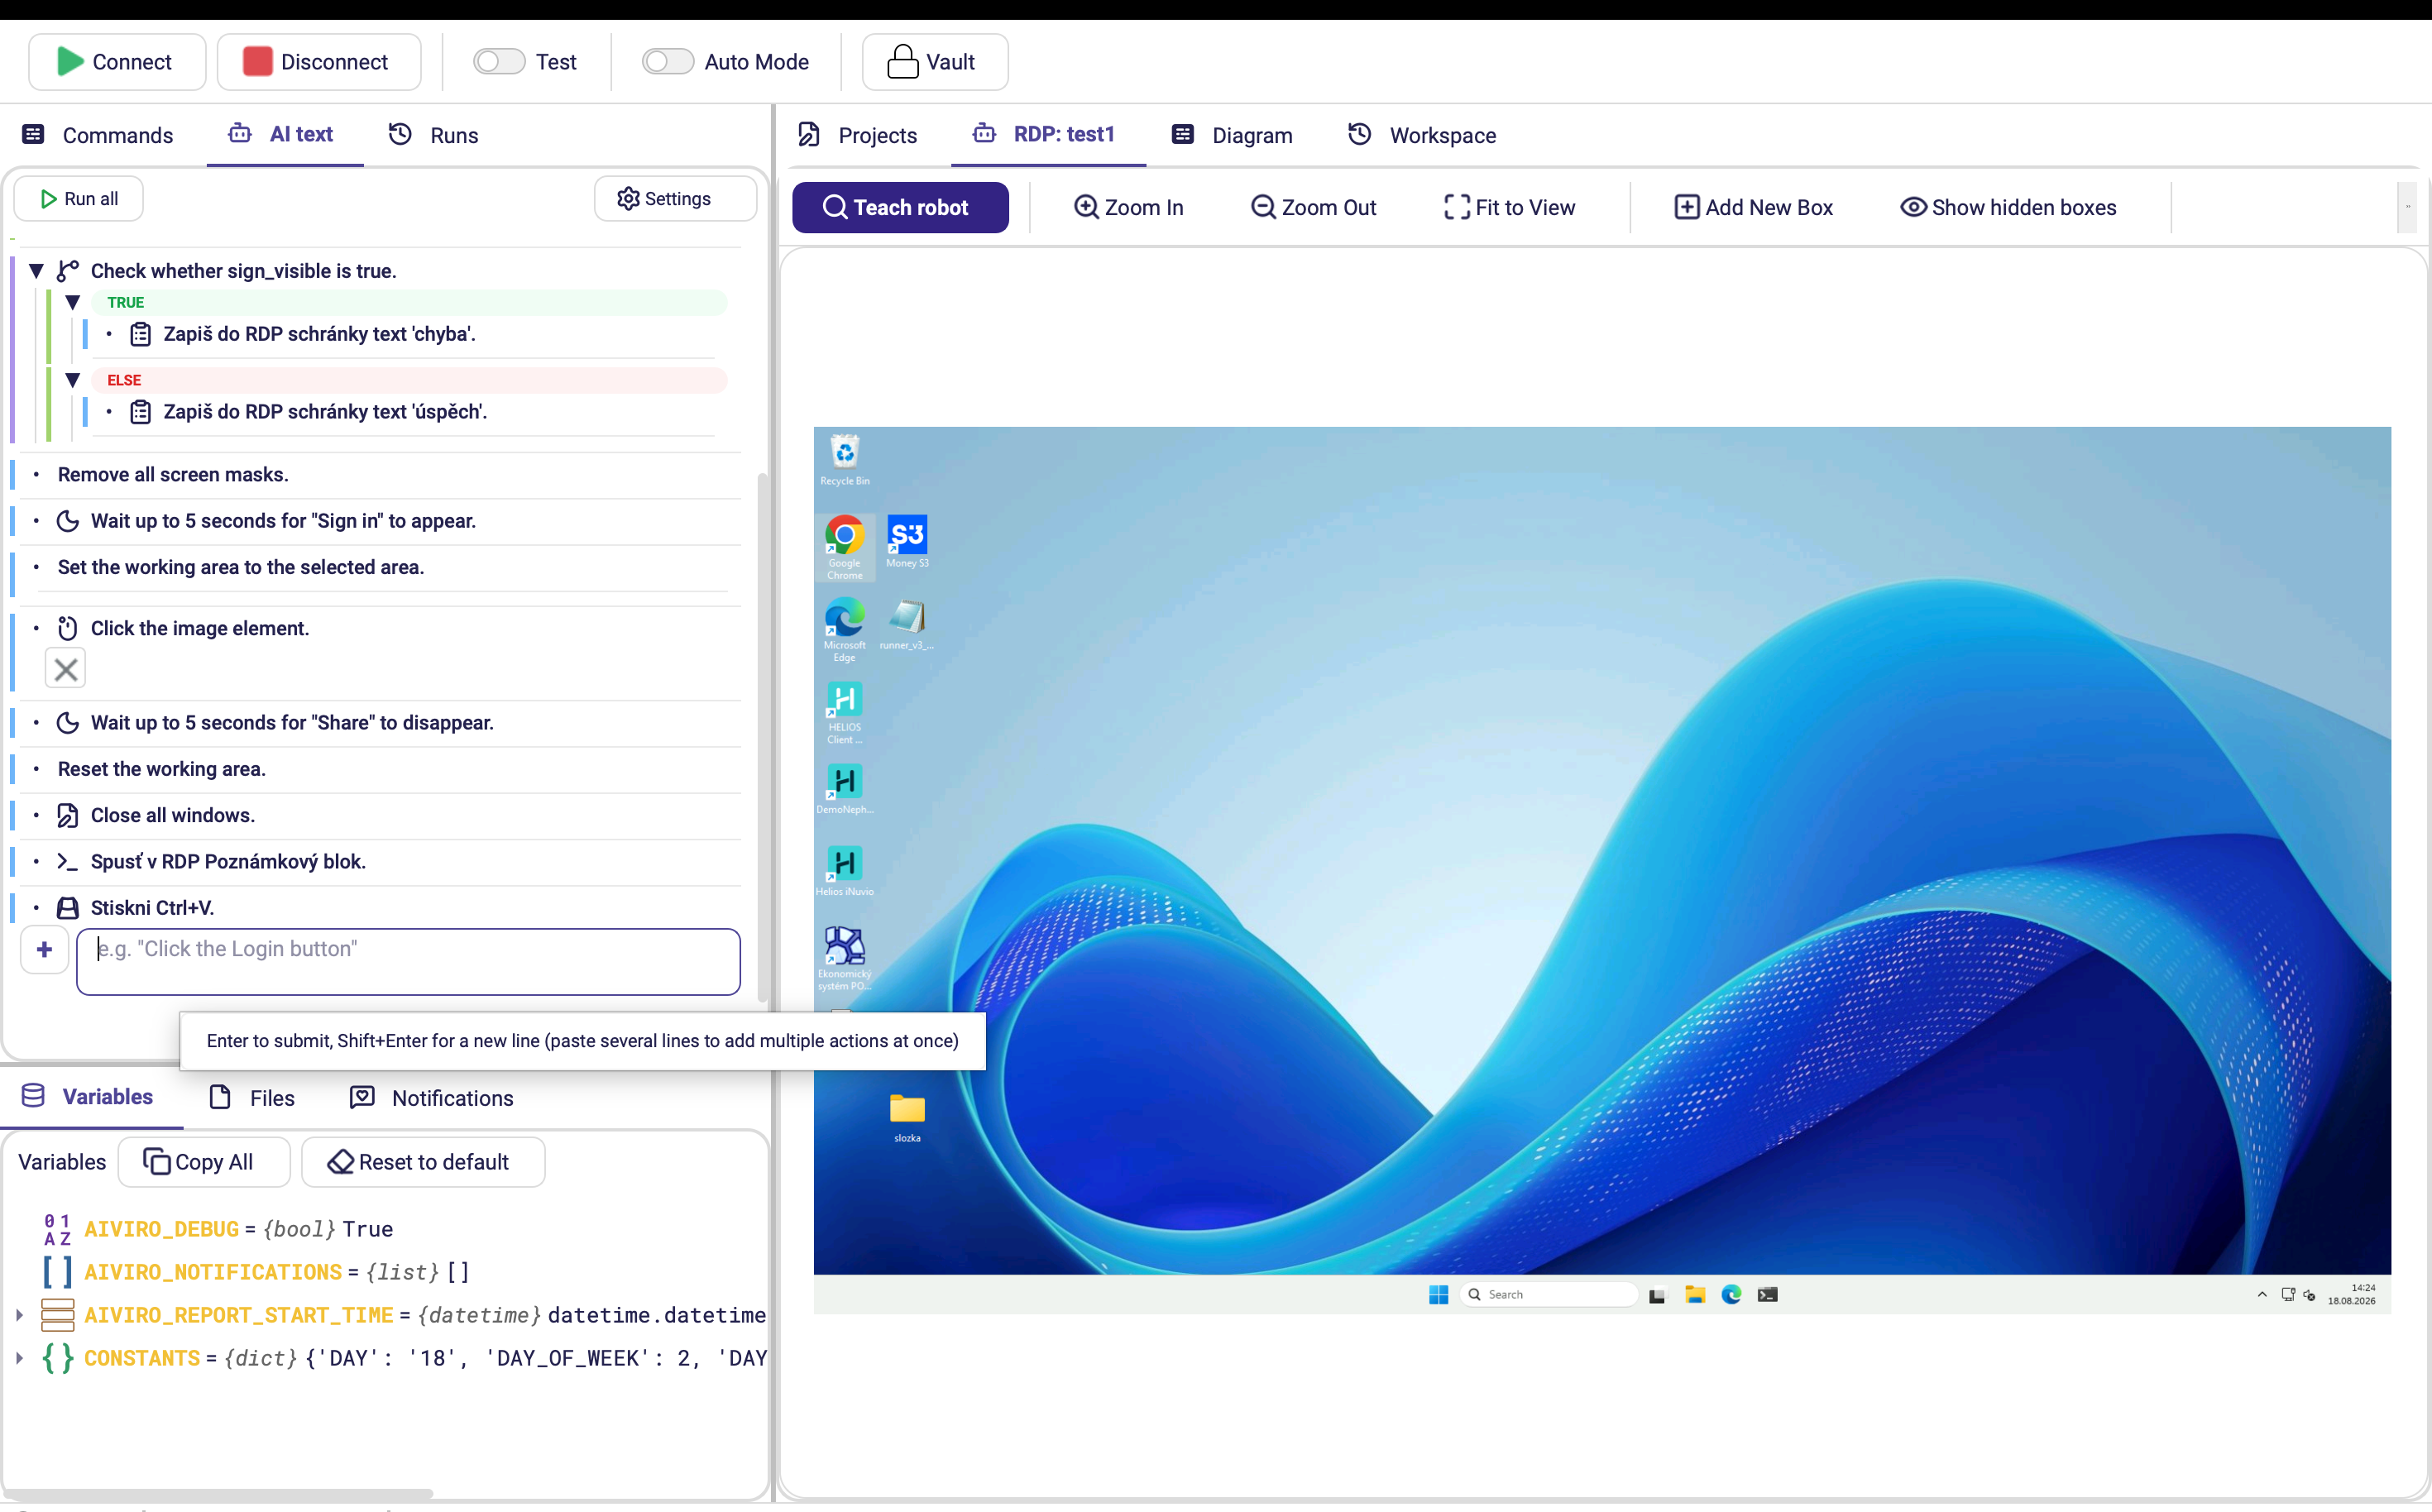
How the tab reads
Every action in the scenario appears as one plain-language sentence with its action icon — "Wait up to 5 seconds for "Sign in" to appear.", "Remove all screen masks.", "Close all windows." You read the whole scenario as prose instead of opening one form after another.
| Element | How it shows |
|---|---|
| Condition | The question as a sentence — "Check whether sign_visible is true." — with its TRUE and ELSE branches indented under it. Both fold away behind the arrow. |
| Nested actions | Indented under their parent, with the branch labels colour-coded. |
| Sentence language | Whatever you wrote. Czech and English sentences can sit side by side in one scenario. |
| Fetch descriptions | Generates the sentences from the actions, for a scenario built by hand in Commands. The descriptions are then saved with the scenario, so the tab loads them instantly next time — the AI is only called when you ask for it. |
| ↻ Sync | Per-action button in the description panel. Re-fetches the sentence for that one action, instead of regenerating the whole scenario. |
The header has Run all and Settings; the input at the bottom is where you type new instructions. Enter submits, Shift+Enter starts a new line, and pasting several lines at once adds several actions in one go.
From 0.25.0 the sentences are kept in the project file and load instantly. The AI is called only when you press Fetch descriptions or an action's ↻ Sync — not when you open a scenario or connect a robot.
Fetching marks the project as unsaved, so the result is kept once you save; it does not consume an undo step.
Up to 0.24.0 every open of a scenario — and every robot connection — triggered a fresh AI call to describe all the actions. That meant a wait and a visible loading state each time, and you paid again for text that had already been generated.
Settings
| Setting | What it does |
|---|---|
| Show details | Renders the low-level technical detail under every action. |
| Auto-focus | Sends only the changed sections to the AI instead of the whole scenario — automatic context passing. |
| Show context | Highlights which actions are included in the AI context window. Actions that are not sent are dimmed. |
| Auto mode | Syncs and applies changes automatically, without confirming with Enter or the Preview Changes button. Queries run continuously as you type. |
| Context | How many actions are sent as context. Default 3 — so each edit sends the 3 actions before and the 3 after. Range 0–50. |
With Auto mode on, a delay control sets how long the Editor waits after you stop typing before querying the AI (0.5–30 s, default 2 s).
Leave Context at its default. Raising it sends more of the scenario to the AI, which
costs time without usually improving the result; lowering it to 0 strips the surrounding
context the AI needs to place an action correctly.
Adding an action
- Move the cursor between two actions — a line appears between them — and click.
- In the input field, type what the action should do.
- Confirm with Enter.
- A progress indicator appears. Cancel interrupts generation at any point — useful when it takes too long or you change your mind.
- Unless Auto mode is on (it is off by default), the result arrives in preview mode, where you decide whether to keep it.
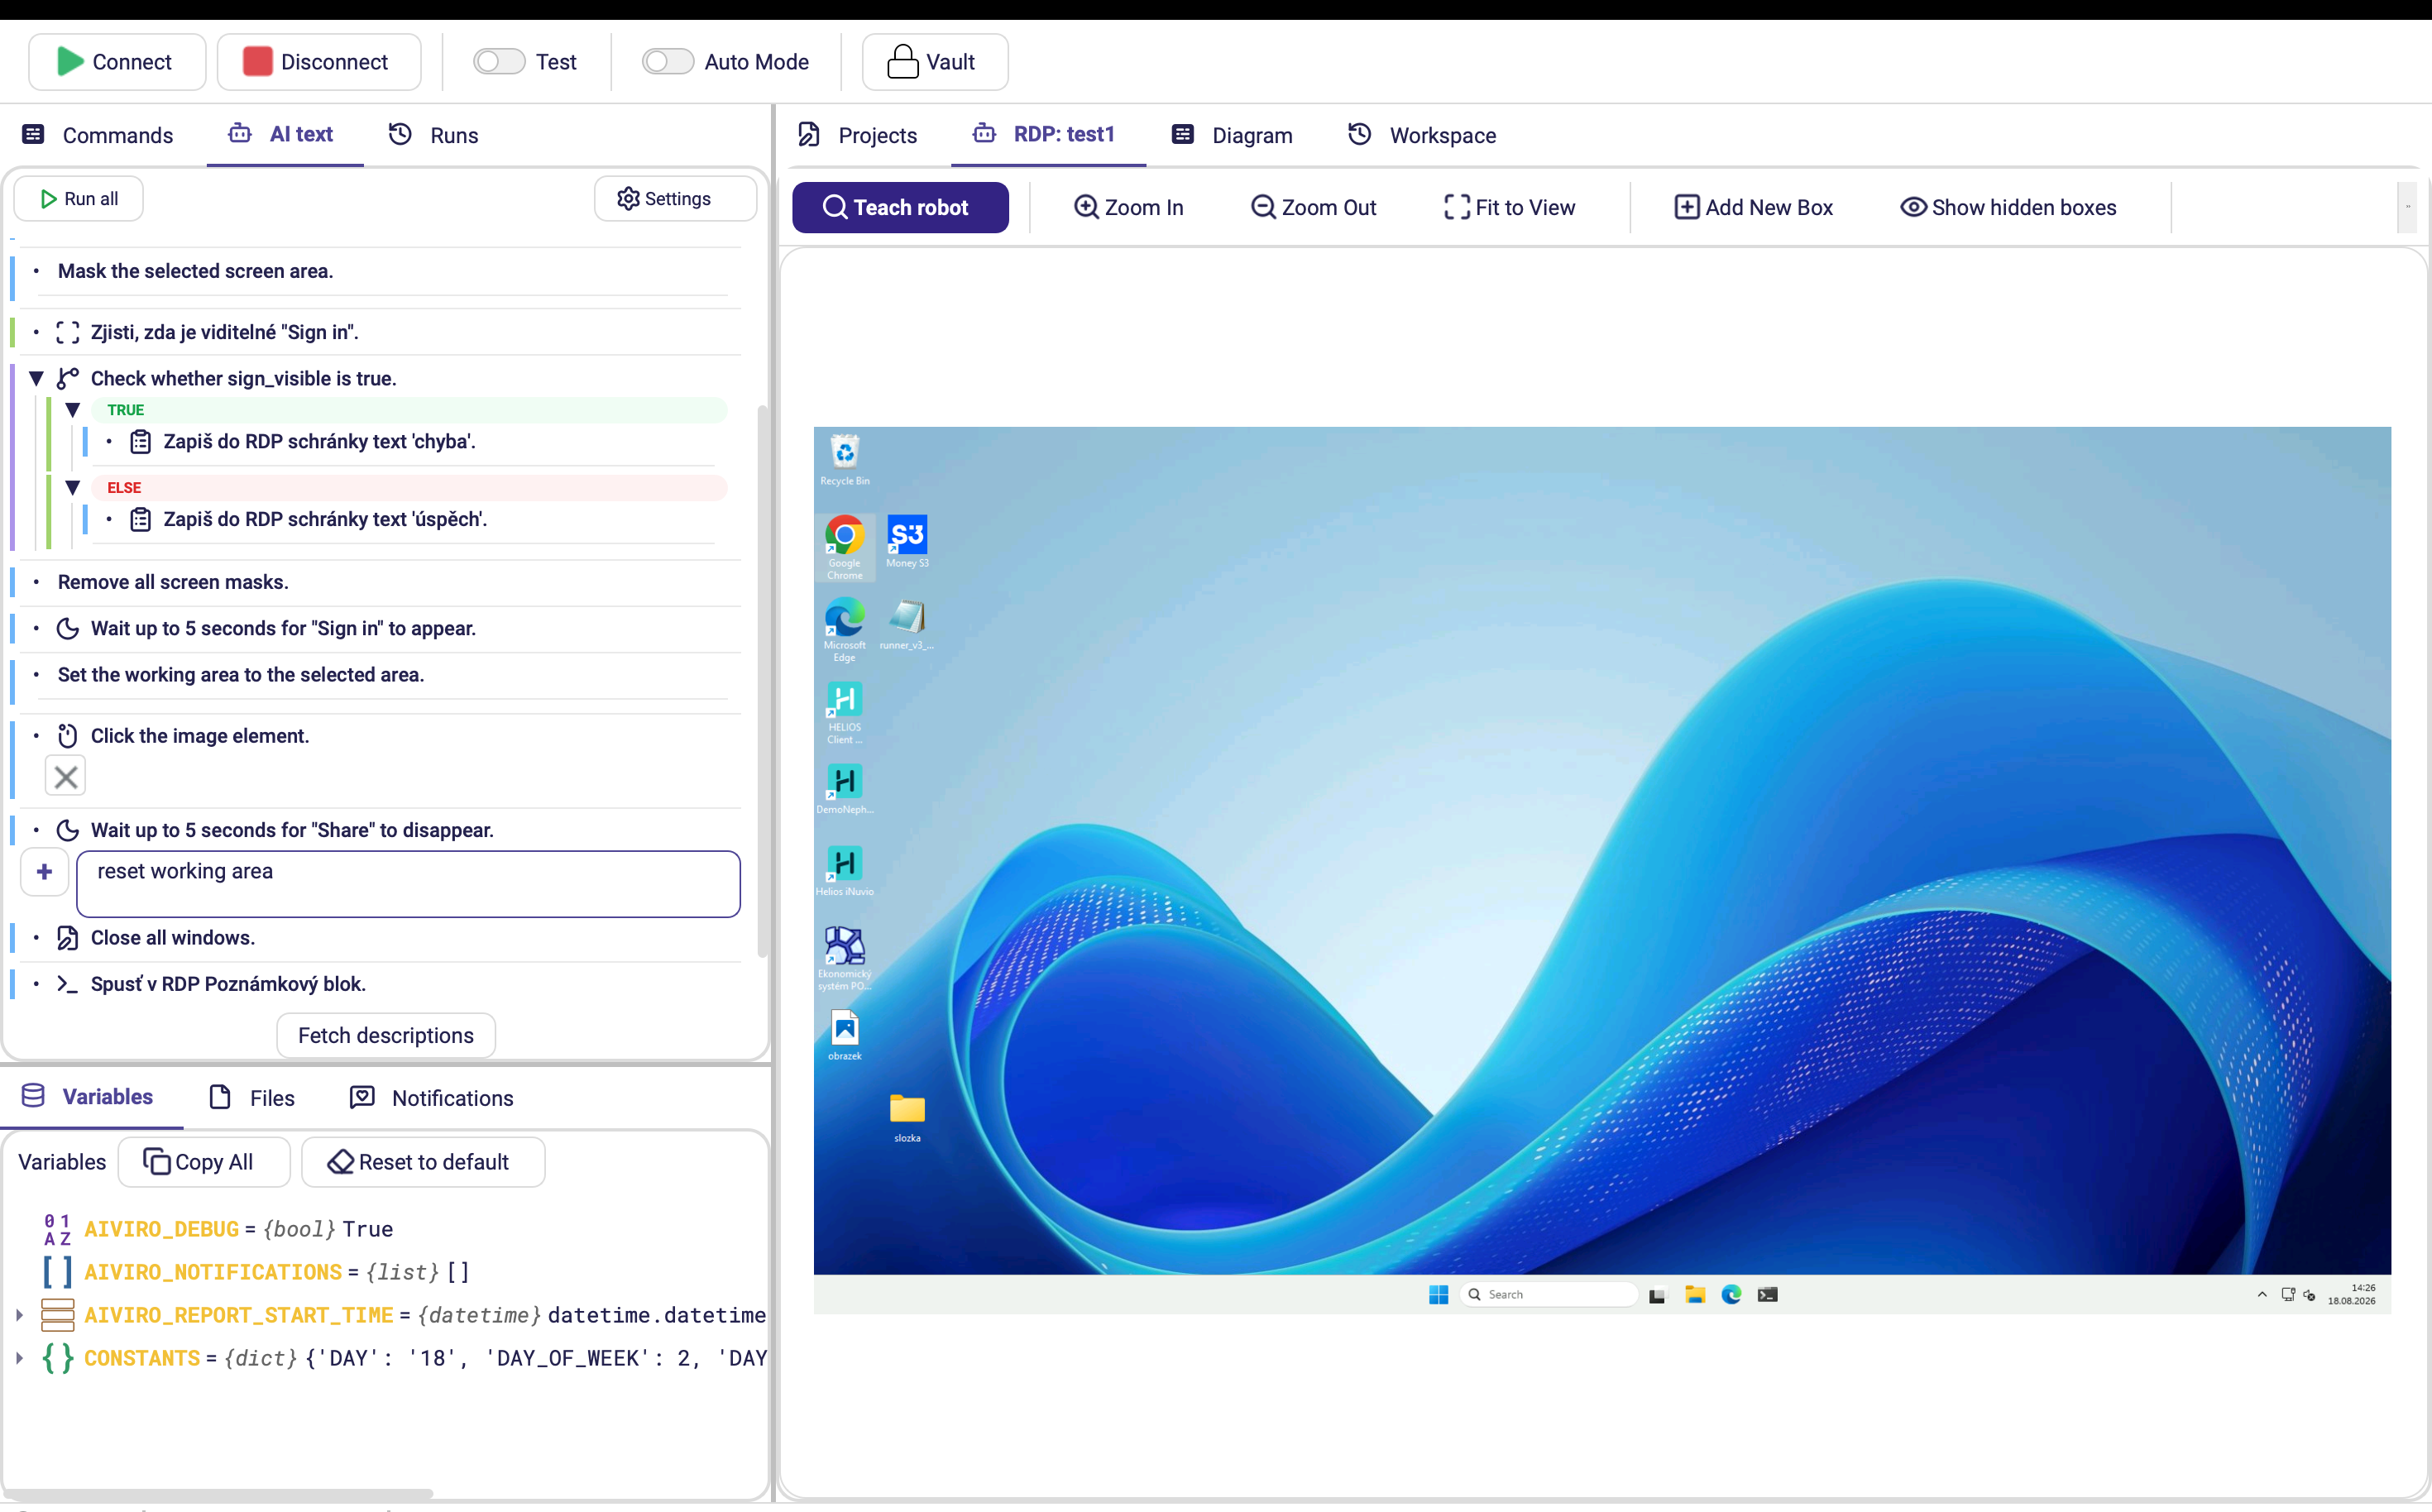
Above, the input sits between "Wait up to 5 seconds for "Share" to disappear." and
"Close all windows.", with the instruction reset working area typed in.
The preview
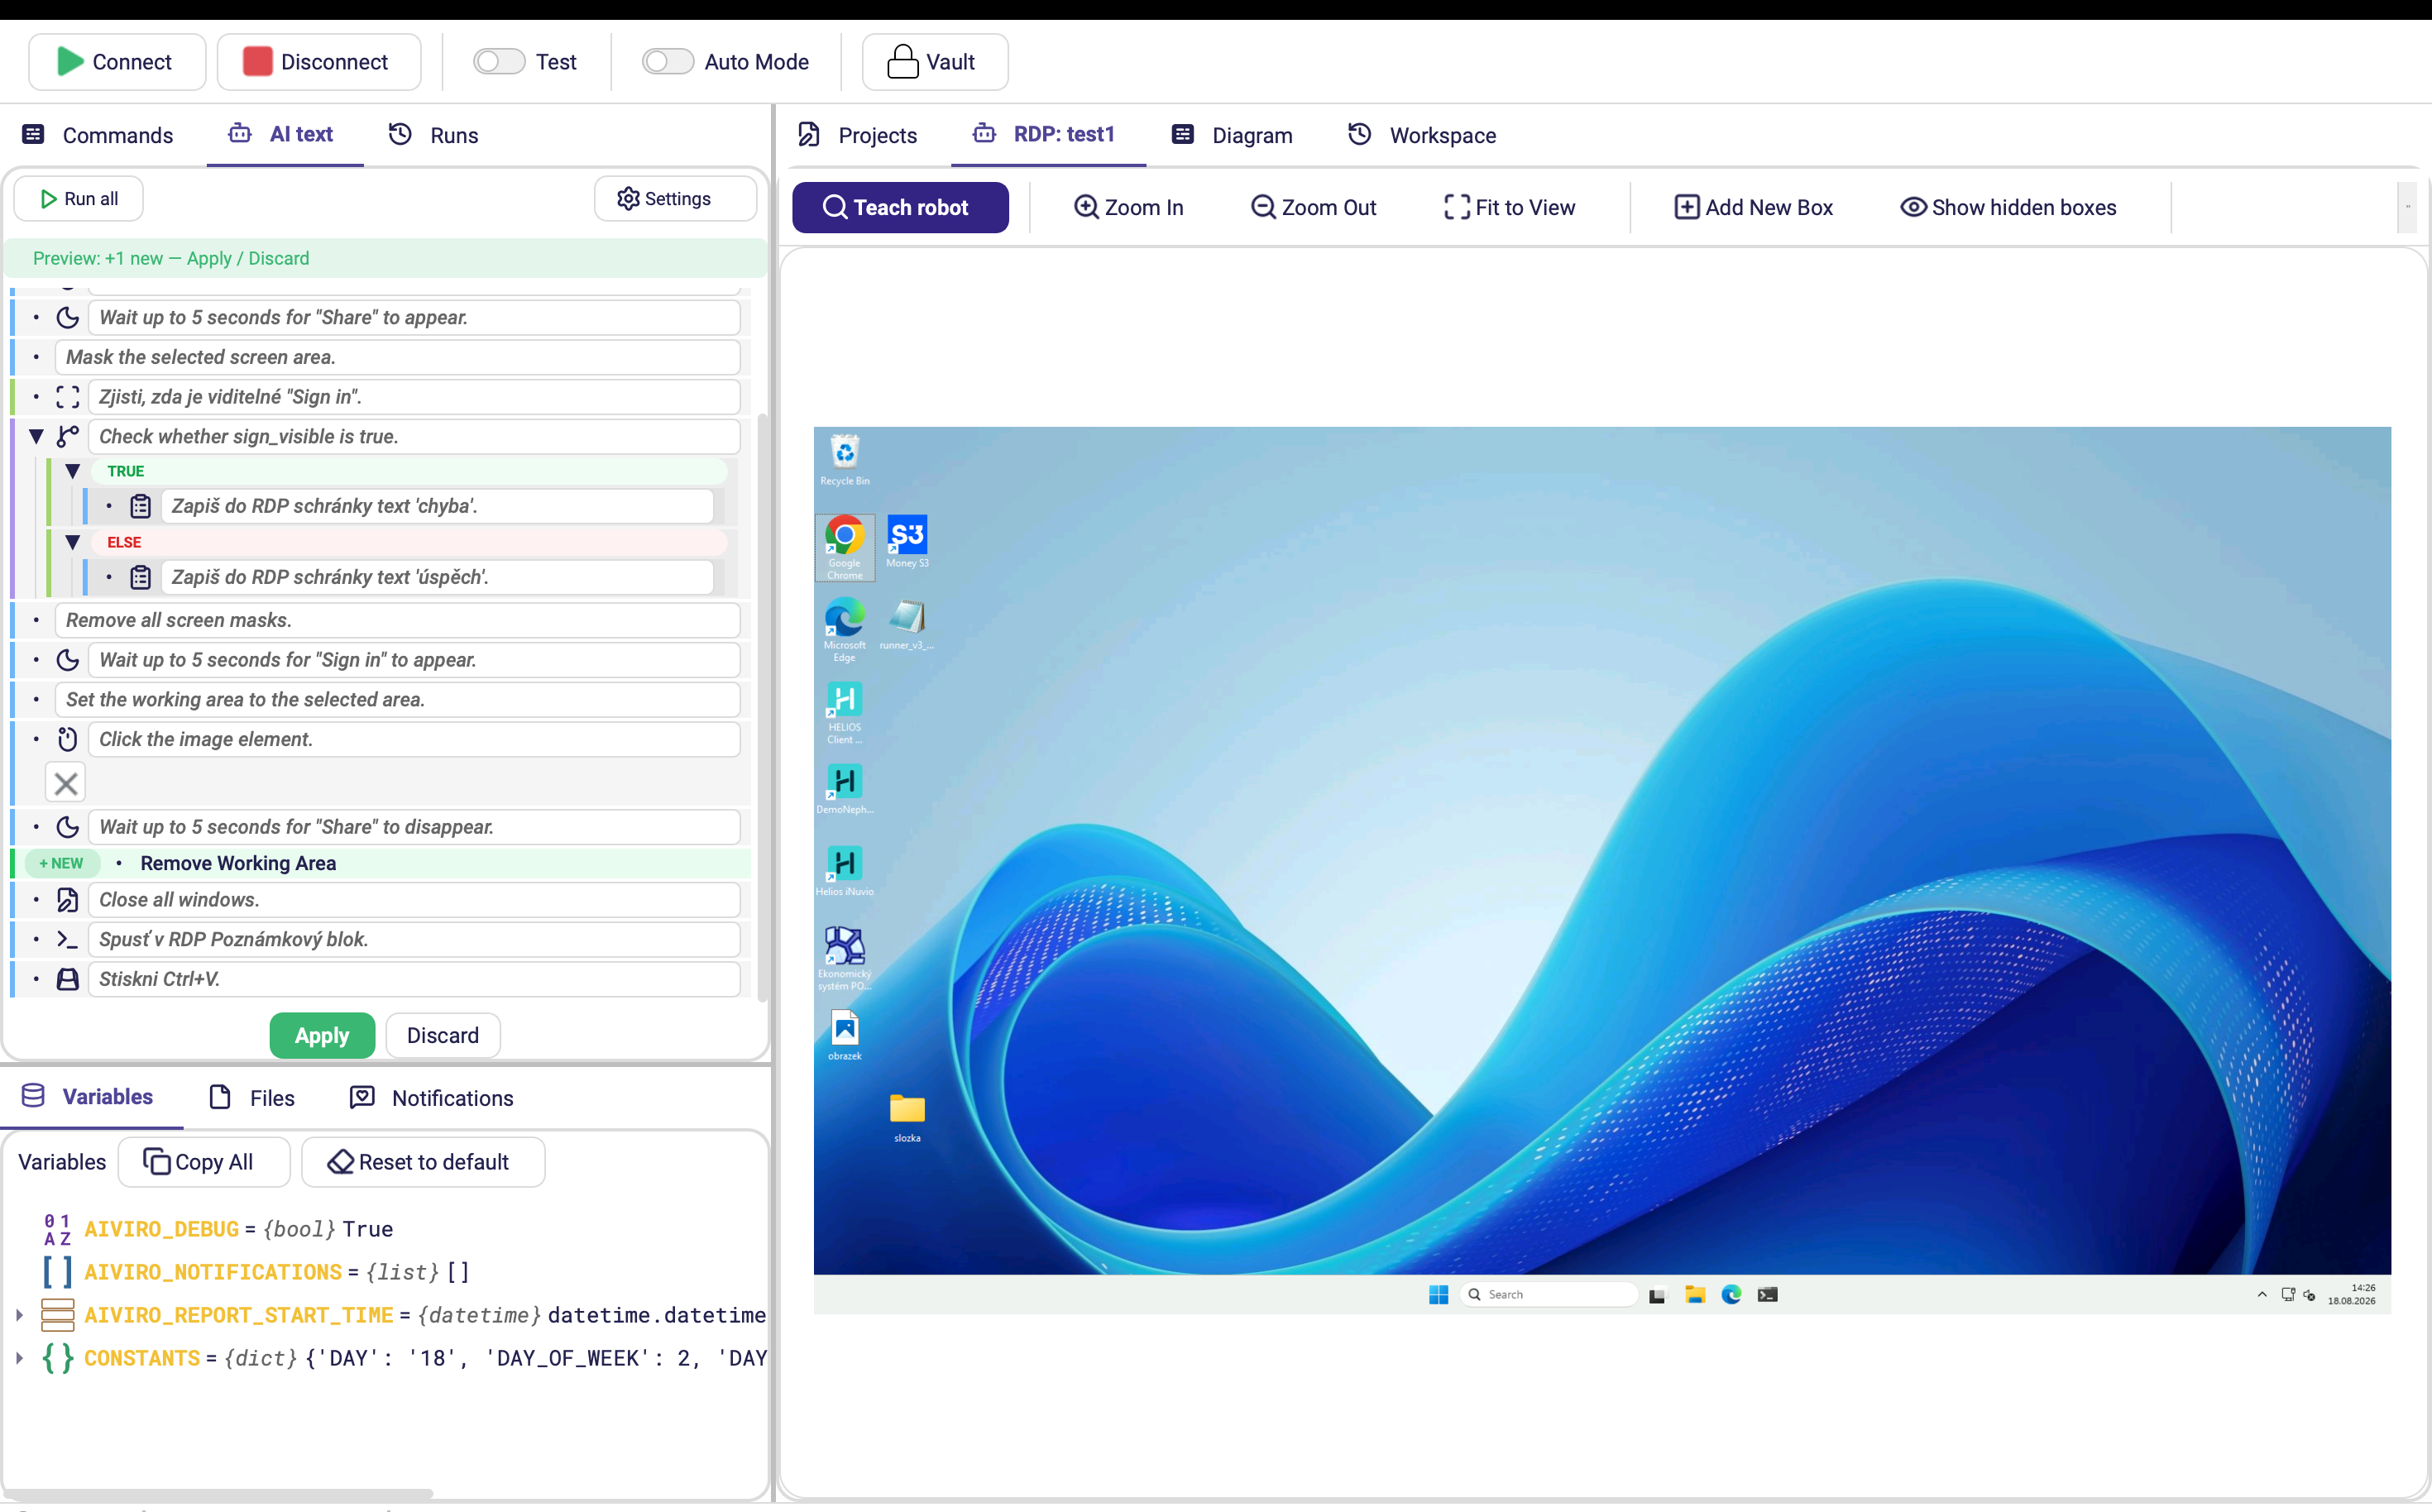
The banner reads Preview: +1 new — Apply / Discard. The existing sentences turn grey, the generated one is highlighted and badged + NEW, so you can see exactly where it landed before you commit to it.
| Button | Effect |
|---|---|
| Apply | Accepts the change and inserts the action. A +NEW badge marks a newly created action. |
| Discard | Rejects the change; the scenario returns to the state it was in before the prompt. |
When the AI writes a message such as "Processed $count invoices", $count is stored as a
real variable reference, so it is substituted at run time. The whole reply is scanned for
variable names before anything is applied, which means a reference resolves even when the
variable is created elsewhere in the same reply — and the preview shows what Apply will
actually store.
If the AI produces an expression that cannot be evaluated, an amber warning appears in the AI text tab immediately after Apply, in your interface language, naming the field you need to fix by hand.
Up to 0.24.0 a variable in AI-generated notification text was stored as plain text and never substituted, so the message went out reading "Processed $count invoices" literally. The preview could also differ from what Apply stored.
Change states shown in the preview:
| State | Meaning |
|---|---|
| NEW | A new action. |
| UPDATE | A change to an existing action. |
| DELETE | The action will be removed. |
Editing an action
- Click the action, put the cursor on the text you want to change, and rewrite it.
- Confirm with Enter.
- The Editor asks whether to preview the change or discard it and go back. Choose Preview Changes.
- The request goes to the AI and comes back in preview mode, exactly as when creating an action.
- The change is shown as EDIT: the original text struck through and the new text next to it. Confirm with Apply or reject with Discard.
Deleting an action
Hover over an action and a cross appears — click it to delete. The action can also be deleted from the ordinary Commands view.
The prompt itself
| Control | Effect |
|---|---|
| Generate | Sends the prompt and generates actions. Shortcut Ctrl+Enter. |
| Preview Changes | Sends a manual edit for the AI to interpret. |
| Regenerate Prompt | Generates a fresh prompt based on the modified actions. |
| Update Prompt | Updates the prompt so it reflects manual changes you made to the actions. |
| Clear prompt | Empties the prompt field. |
| Accept / Back | Confirms the result, or returns to the previous step. |
The prompt field has a character limit, shown as a counter next to it.
Update Prompt keeps the description and the actions in sync. If you hand-edit generated actions and then regenerate from a stale prompt, your edits are replaced — refresh the prompt first.
Context menu on an action
Right-clicking an action in Scenario Description offers:
| Item | Effect |
|---|---|
| Run | Runs that action. |
| Run and continue | Runs the action and carries on with the following ones. |
| Edit | Opens the ordinary action form. Double-clicking does the same. |
| Delete | Deletes the action. |
Action statuses
Just as in the ordinary view, you see the state of each action during a run — whether it is in progress or already finished. The states are the same as in the Runs panel.
Bulk editing several actions
In the Commands view you can select several actions and invoke a bulk AI action over them — for changing or reorganizing many actions at once.
- Select the actions in Commands.
- Invoke the AI prompt over the selection and type the instruction — for example to delete all the selected actions.
- Press Send and switch to the AI text tab.
- Depending on Auto mode, either confirm or discard the change.
While a scenario is running
Starting a run puts the AI text tab into an explained read-only state, with the banner Scenario is running — AI Text is read-only. You cannot edit, delete or re-run action cards from here while the robot is working.
The Commands tree stays browsable while locked, so you can still read the scenario and watch it progress — it just looks locked rather than frozen.
Up to 0.23.x the panel stayed editable during a run, which silently changed the scenario underneath the robot executing it.
Conditions keep exactly two branches
A Condition always has its True and False branch and nothing else. When the AI misplaces a step that would become a third branch, that step is put after the Condition instead of inside it.
Scenarios corrupted by an older version — the ones that refused to open with "Condition action must have exactly 2 children" — repair themselves when opened in 0.24.0.
Loops nest normally
Loops have no such branch limit. When your request calls for repetition — "for every row in the table…", "for each e-mail with an attachment…" — the AI creates a loop block, most commonly Repeat for each item in iterating over a list variable, and places the repeated steps inside it as its children. Repeat until and Repeat x times work the same way, and loops can nest — a loop over e-mails can contain a loop over each e-mail's attachments. See Loop actions for what each loop type does.
Related
- AI Read — extracting structured data, rather than generating actions.