Orchestrator – Scheduling & Automatic Execution
The Orchestrator is the component of Aiviro Editor that turns your design‑time scenarios into production‑ready, fully automated jobs. Once enabled, it launches each scenario at the exact time you specify—no extra coding, no manual clicks.
Why the Orchestrator matters
| Benefit | What it means in practice |
|---|---|
| Hands‑off execution | Jobs start on their own according to the schedule you define. |
| Central timing logic | All schedules live inside the project file—no external cron, Task Scheduler or services required. |
| Production safety | Scenarios run exactly as tested in the Editor; no code modifications between design and production. |
note
Prerequisites
- Aiviro Editor must remain open—either on your workstation or a dedicated VM.
- The scenario’s Active flag and the global Auto Mode slider have to be enabled.
Scenario settings
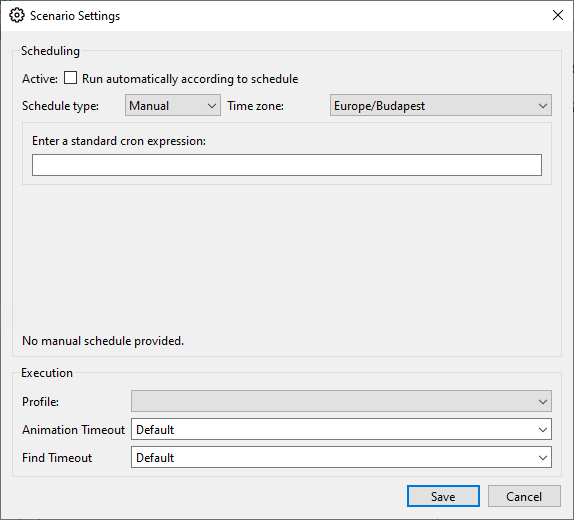
| Section | Key fields | Notes |
|---|---|---|
| Scheduling | Active — check to allow the Orchestrator to pick up this scenario. Schedule type — choose one of the presets listed below. Time zone — keeps local and server clocks in sync. Cron expression — standard five‑field syntax. | When Manual is selected, the scenario is scheduled based on specified Cron. |
| Execution | Profile — one of saved robot profiles for the scheduled runs. Animation Timeout / Find Timeout — per‑scenario overrides of the global defaults. | Keep them on Default unless a particular application needs more (or less) time to respond. |
Schedule types
| Type | When it runs |
|---|---|
| Manual | According to the configured Cron. |
| Minutely | Every minute (or custom minute interval). |
| Hourly | At the defined minute of each hour. |
| Daily | At the defined time each day. |
| Weekly | At the defined time on the selected weekday(s). |
| Monthly | At the defined time on the selected day of the month. |
Viewing the master schedule
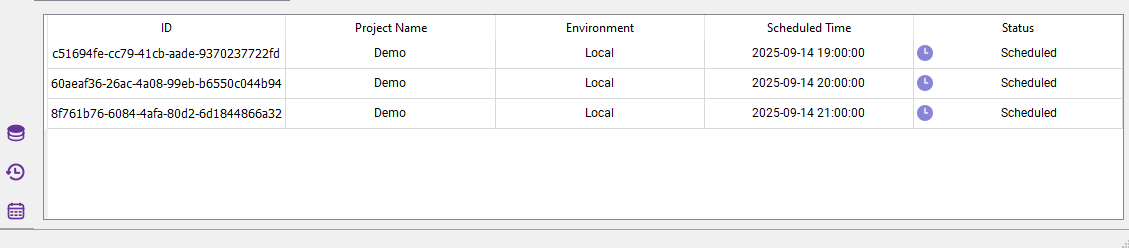
The Scheduler side‑panel shows every upcoming run across all projects that:
- Have Active turned on, and
- Sit inside an Editor instance with Auto Mode enabled.
| Column | Meaning |
|---|---|
| ID | Unique identifier of the scheduled job instance. |
| Project Name / Environment | Where the scenario lives and which robot profile it will use. |
| Scheduled Time | Exact timestamp (in the Editor’s time‑zone) when the run will start. |
| Status | Scheduled, Running, Succeeded, Failed, etc. |
Putting it all together
- Design your scenario and test it manually.
- Open Scenario Settings.
- Tick Active, choose a schedule type (e.g. Daily) and define the time.
- Save.
- Slide the Auto Mode switch (top toolbar) to On.
- Leave Aiviro Editor running. That’s it—your job will now fire at the scheduled moments.
note
Tip: Need to pause production quickly? Toggle Auto Mode off; all scheduled jobs stop until you enable it again.
Troubleshooting
| Symptom | Likely cause | Fix |
|---|---|---|
| Scenario never starts | Active not checked, or global Auto Mode disabled. | Enable both. |
| Runs at wrong hour | Mis‑matched Time zone field. | Pick the correct zone in Scenario Settings. |
| Warning “No manual schedule provided” | Schedule type is Manual with no Cron expression set. | Set a valid Cron expression. |