Tips & Tricks
Do you want to know how to make your Aiviro scripts faster, cleaner, better and more reliable? Then you’ve come to the right place. These tips & tricks are made to help you with that!
Search object strategy of Aiviro
We’re using the concept of Element Objects for specifying which object you can interact with. In short, if you want to click on a Button with the text “Search”, you can do it the following way:
>>> import aiviro
>>> r = aiviro.create_web_robot(headless=True)
>>> r.click(aiviro.Button("Search"))
In the background Aiviro will take care of everything. It’ll recognize all the elements (Button, Input, Text, etc.) presented on the screen. And it’ll search for the Button which contains the text “Search”.
Let’s look deeper into how exactly Aiviro is selecting the right element for you. This will help you to write fast and reliable scripts. There are two main categories of elements that we recognize:
Predict elements -
Input,Button,CheckBox,RadioButton,Toggle,TextArea,IconText elements -
Text
Tip
In case of searching for Text element, Aiviro will search through for the corresponding text in all of Text elements.
Tip
Every one of Input, Button, CheckBox, RadioButton, Toggle, TextArea or Icon elements are identified by some text. It’s mostly a text which is inside or very close to the corresponding element. This text is used in element lookup logic.
Let’s take the Button from the example above Button("Search"). Aiviro will firstly look through all of the buttons.
[Removed logic in version 3.19.0]
If no Button is found, then it will search through the other Predict elements (Icon excluded). In some scenarios searching for Button can result in finding an Input. If still none of the searches resulted in success then Aiviro will search through all Text elements.
[New logic in version 3.19.0]
The search strategy has been changed. Now Aiviro will only look only through specified Predict element, e.g. Button and then through all Text elements. It skips the middle step, it won’t search through other types of Predict elements.
Note
Every Element Objects contain an argument strict: bool. If it’s set to True, Aiviro will search only for the specified element type.
They’re also several options of matching the text which specifies the element. See Control Parameters for more info.
>>> r.click(aiviro.Button(
...     "Search",
...     strict=True,
...     find_method=aiviro.find_method.EQUAL
... ))
Searching for Key-Value Pairs
When working with applications or documents, you may often need to search for specific key-value pairs on the screen.
For example, you might need to locate an Order Number: PO_1234.
In this case, the key is Order Number and the value is PO_1234.
To facilitate this, you can use the RegexText and OnTheRight search objects provided by Aiviro.
It’s important to include groups in the regex pattern so you can extract the exact value you want, as sometimes additional text you don’t want can be included in the search results. To try your regex patterns, you can use online tools like regex101.
import aiviro

r = aiviro.create_desktop_robot()

# Use OnTheRight to find the value relative to the key/reference
value = aiviro.OnTheRight(
    aiviro.RegexText(r"(PO_\d{4})"),
    aiviro.Text("Order Number"),
)

# Search for the value on the screen
if ord_num_box := r.get(value):
    # Extract the exact value using the regex group
    print(f"Found order number: {ord_num_box.regex_match.group(1)}")
else:
    print("Order number not found.")
Create a custom Search Object
Sometimes you want to find a specific element or specific text and you want to do that several times in your script. In that case it comes handy to create your own, custom Search Object. The concept of Search Objects should already be familiar to you, as it’s the basic block for working with Aiviro. If not please check it out before reading this.
There are two ways how to create a custom Search Object:
First one comes handy if you are looking for a specific text, let’s say a date (e.g. 29.02.2020).
You can create a search-object called Date() which inherits from an search-object Text, as follows:
class Date(aiviro.Text):
    def __init__(self, element_index: int = None)
        super().__init__(
            label=r'\d{2}.\d{2}.\d{4}',
            find_method=aiviro.find_method.REGEX,
            element_index=element_index
        )
We also included argument element_index into element’s constructor, to give us a more robust option how to work with our custom search-object.
The second option for creating your custom search-object is useful, if you are looking for a more complex object on the screen. Let us show an example where we want to get all phone numbers from the table’s column:
class PhoneNumbers(aiviro.CustomSearchObject):
    def __init__(self):
        super().__init__(
            aiviro.Below(
                aiviro.Text(
                    r'^\+(\d{1,3})(( ?\d{3}){3})$',
                    aiviro.find_method.REGEX
                ),
                aiviro.Text("Phone Numbers")
            )
        )
After creating our custom search-objects, we can now easily use them in our script.
>>> import aiviro
>>> from some_module import Date, PhoneNumbers
>>> r = aiviro.create_desktop_robot()
>>> r.click(Date())
>>> phone_boxes = r.get(PhoneNumbers())
Unrecognized element
In a few cases, when we use Aiviro for an app for which it has never been used before, it may not recognize all the elements on the screen. Like in the example below, where Input element is not recognized.
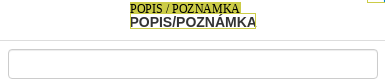
Unrecognized Input element
To interact and type text into the unrecognized Input element, we can customize the Text("POPIS/POZNAMKA") with a CustomBox search-object.
>>> import aiviro
>>> r = aiviro.create_desktop_robot()
>>> r.type_text(
...     aiviro.CustomBox(
...         aiviro.Text("POPIS/POZNAMKA"),
...         y_min_offset=35,
...         y_max_offset=35
...     ),
...     "text to type"
... )
Create a working area from a newly opened window
Having modal windows for uploading files or changing options is fairly common in applications nowadays. Also, applications needn’t have to be opened in fullscreen mode as we’ll demonstrate in our example below.
In these types of situations we want to work only inside of this newly opened window, but how to do it? For these purposes, we have implemented an option to create a working area from the difference of two screenshots. In our example, we’ll open the recycle bin window. Let’s see how to do it.
>>> import aiviro
... # The robot will connect to a remote windows machine
>>> r = aiviro.create_rdp_robot("ip-address", "username", "password", "domain")
... # We'll wait until the machine is fully loaded by waiting until icon for a Recycle Bin icon
>>> bin_box = r.wait_for(aiviro.Icon("Recycle Bin"))
... # We'll create a checkpoint for our working area,
... # this command will make screenshot of the display and store it by a specified name ("desktop")
>>> r.add_working_area_checkpoint("desktop")
... # Open recycle bin by double-clicking on it
>>> r.double_click(aiviro.Icon("Recycle Bin"))
... # Wait until Recycle Bin window is open
>>> r.wait_for(aiviro.Text("This PC"))
... # This command will make another screenshot and compare it with the previous one from our checkpoint ("desktop")
... # the difference between the screens is our working area.
>>> with r.set_working_area_by_checkpoint("desktop"):
...     # now we'll click on a "Recycle Bin" text which is inside of our opened window
>>>     r.click(aiviro.Text("Recycle Bin"))

Loaded Windows desktop
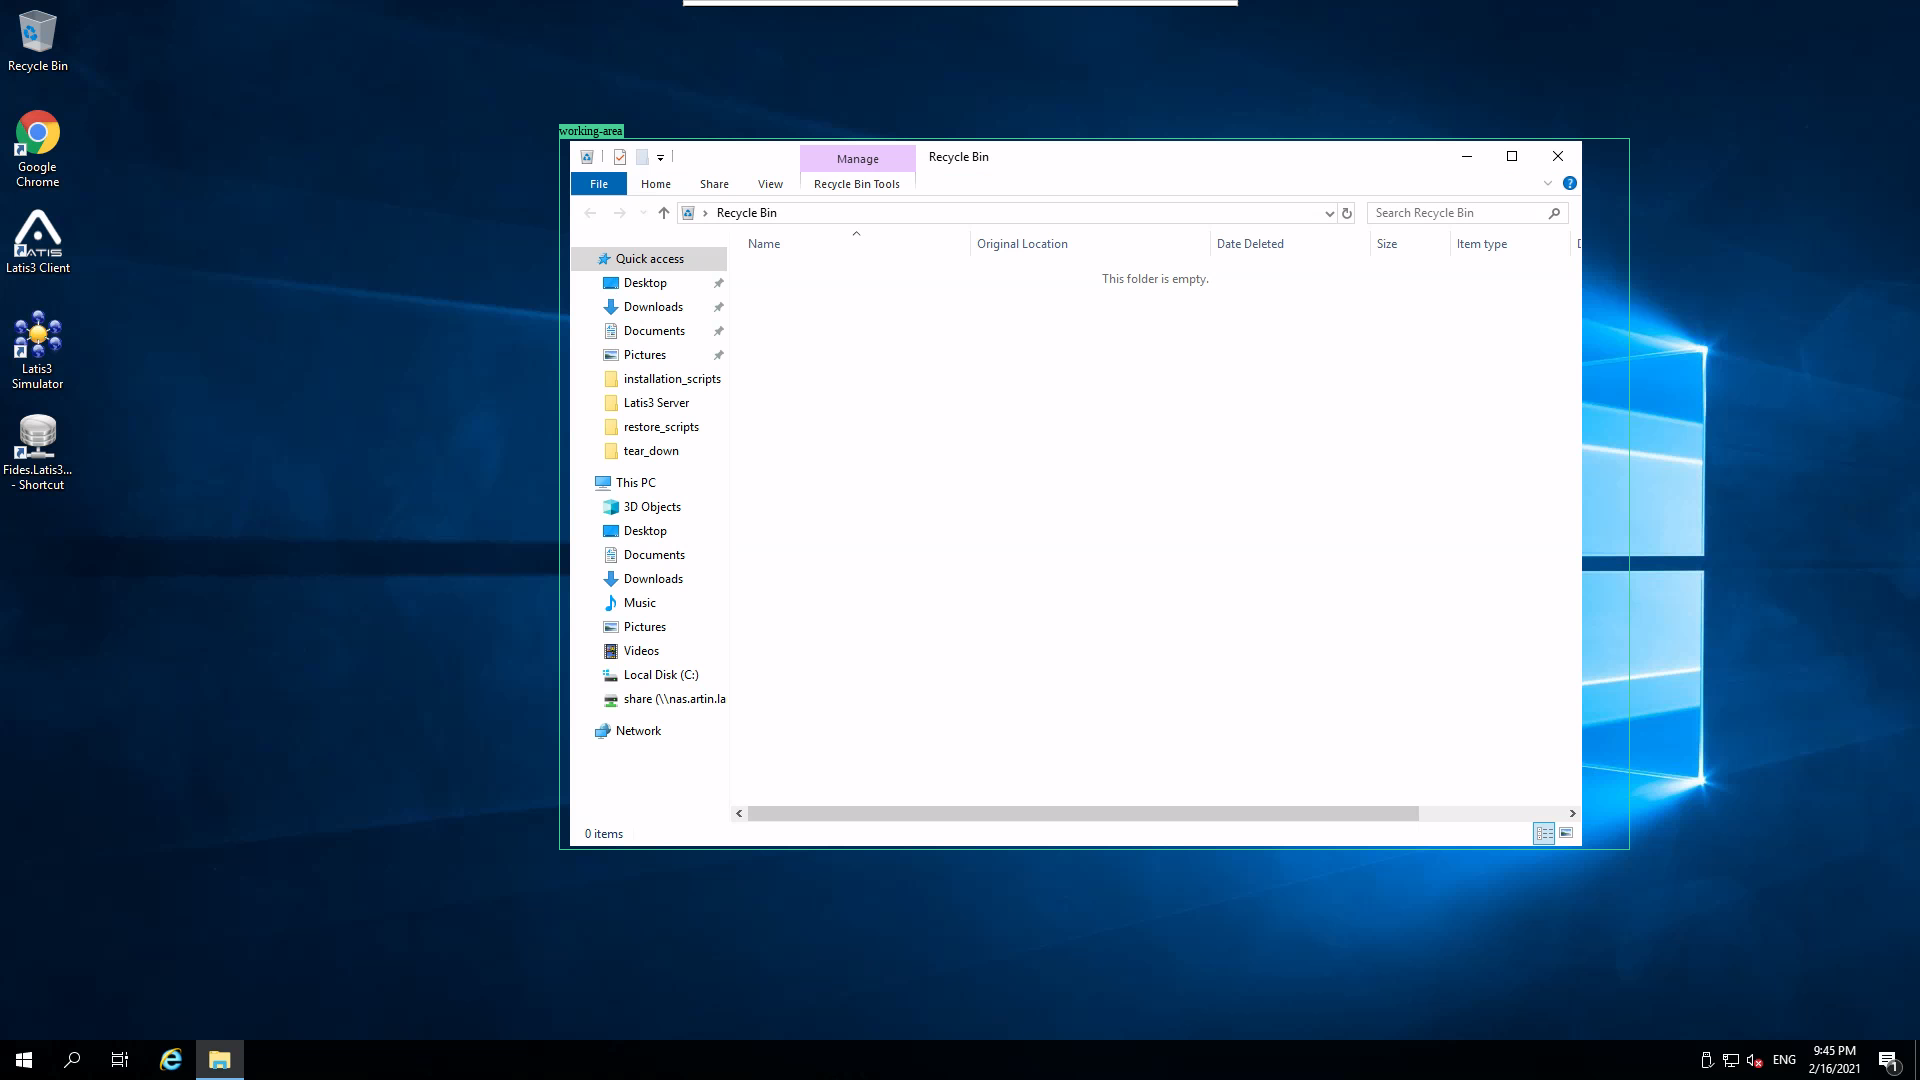
Created working area using checkpoint commands
Exceptions
For the list of all possible Aiviro exception, see Exceptions section.
Invalid type of object for search
When you encounter this exception, the error message should look similar to the one below:
Traceback (most recent call last):
  File "/home/*/sandbox/demo_test.py", line 33, in <module>
    r.click(box)
  File "/home/*/aiviro/robot.py", line 408, in click
    move_away=move_away,
  File "/home/*/aiviro/utils/common.py", line 74, in inner
    x = foo(*args, **kwargs)
  File "/home/*/aiviro/commands/commands_device.py", line 44, in execute
    stable_screen, (box,) = self.ser_fact.cross_val_service.find_and_validate_search_objects([element])
  File "/home/*/aiviro/services/crossvalidation_service.py", line 208, in find_and_validate_search_objects
    elements=elements, allow_list_of_boxes=False
  File "/home/*/aiviro/services/crossvalidation_service.py", line 162, in find_and_validate_search_objects_as_list
    find_many_boxes=allow_list_of_boxes,
  File "/home/*/aiviro/services/find_service/find_service.py", line 68, in process_search_object
    [],
  File "/home/*/aiviro/services/find_service/find_service.py", line 181, in _process_inner_object
    f"Invalid type of object for search: '{inner_element}'"
aiviro.utils.exceptions.SearchObjectError: Invalid type of object for search: '[<BoundBox TEXT [518, 159],[558, 178] 'HTML'/>, <BoundBox TEXT [629, 223],[767, 276] 'HTML'/>, <BoundBox TEXT [627, 297],[669, 317] 'HTML'/>, <BoundBox TEXT [1034, 325],[1075, 345] 'HTML'/>, <BoundBox TEXT [276, 499],[313, 511] 'HTML'/>, <BoundBox TEXT [628, 514],[668, 534] 'HTML'/>, <BoundBox TEXT [278, 573],[314, 587] 'HTML'/>, <BoundBox TEXT [387, 622],[424, 636] 'HTML'/>, <BoundBox TEXT [652, 682],[692, 700] 'HTML'/>, <BoundBox TEXT [292, 769],[328, 782] 'HTML'/>, <BoundBox TEXT [979, 821],[1020, 839] 'HTML'/>, <BoundBox TEXT [627, 935],[669, 953] 'HTML'/>, <BoundBox TEXT [1039, 962],[1080, 981] 'HTML'/>, <BoundBox TEXT [628, 1044],[669, 1060] 'HTML'/>]'
This exception is raised when you pass an incorrect type of search-object argument into commands like click(), clear_and_type(), see() or others.
Mostly it happens with a combination of using get() or wait_for() command before them.
Let’s see an example below to better understand it.
>>> import aiviro
>>> r = aiviro.create_web_robot(headless=True)
>>> r.go_to_url("https://developer.mozilla.org/en-US/docs/Web/HTML")
... # Here we search for an element Text("HTML"), but as there are several "HTML" texts on the website,
... # the `wait_for` command will not return just one box, but a list of boxes.
>>> box = r.wait_for(aiviro.Text("HTML"))
... # And `click` command is expecting single box or single search-object as an argument,
... # but we are passing a list of boxes into the `click` command, and that's where the exception is raised.
>>> r.click(box)
The solution is to specify element_index argument in the Text("HTML") element, so that the wait_for() command will return only one box.
>>> box = r.wait_for(aiviro.Text("HTML", element_index=0))
Too many elements found
Another exception can be raised if there are several same elements on the screen.
For example, we want to click on the element Text("HTML"), but there is 14 of them on the screen.
>>> import aiviro
>>> r = aiviro.create_web_robot(headless=True)
>>> r.go_to_url("https://developer.mozilla.org/en-US/docs/Web/HTML")
>>> r.click(aiviro.Text("HTML"))
Traceback (most recent call last):
  File "/home/*/sandbox/demo_test.py", line 33, in <module>
    r.click(aiviro.Text("HTML"))
  File "/home/*/aiviro/robot.py", line 408, in click
    move_away=move_away,
  File "/home/*/aiviro/utils/common.py", line 74, in inner
    x = foo(*args, **kwargs)
  File "/home/*/aiviro/commands/commands_device.py", line 44, in execute
    stable_screen, (box,) = self.ser_fact.cross_val_service.find_and_validate_search_objects([element])
  File "/home/*/aiviro/services/crossvalidation_service.py", line 208, in find_and_validate_search_objects
    elements=elements, allow_list_of_boxes=False
  File "/home/*/aiviro/services/crossvalidation_service.py", line 162, in find_and_validate_search_objects_as_list
    find_many_boxes=allow_list_of_boxes,
  File "/home/*/aiviro/services/find_service/find_service.py", line 82, in process_search_object
    f"Too many elements ({len(boxes)}) found for {element}."
aiviro.utils.exceptions.SearchObjectError: Too many elements (14) found for <Text "HTML" FindMethod.SIMILAR/>.
The solution is to specify element_index in the Text("HTML") element, or set-up some working area.
>>> import aiviro
>>> r = aiviro.create_web_robot(headless=True)
>>> r.go_to_url("https://developer.mozilla.org/en-US/docs/Web/HTML")
... # we will click on the first "HTML" element using 'element_index' argument
>>> r.click(aiviro.Text("HTML", element_index=0))
... # or set-up working area
>>> with r.set_working_area(
...     aiviro.BoundaryArea(second_boundary=aiviro.Text("Change language"))
... ):
>>>     r.click(aiviro.Text("HTML"))